It's been a little while since I've gone into any detail on any of my current projects. I've also never posted anything about quilting here--probably because I haven't actually done any quilting since several years before I started this blog. XD Clearly that's been an oversight on my part. Anyone who follows me here, on Twitter, on Facebook, or wherever should know that I usually only feel content when I'm buried under more projects than I can possibly handle. If quilting was missing from my list of projects, it wasn't from any sane thought on my part, I promise.
This is my current quilting project:
For those of you unfamiliar with the Final Fantasy game series, this is a moogle. When I drew this particular moogle, I was referencing Mog from Final Fantasy VI. This was one of many things where I declared that it would be the most awesomest thing ever if I made a quilt with a moogle on it, and not just a moogle appliqued on it, but a moogle built into the quilt itself. My husband gave me that look (I get it a lot, but that should be no surprise). I squeed, made a pattern, bought fabric, cut up fabric, and assembled the quilt face. All that took only about 2 weeks (surprisingly... of course, I wasn't doing much else during those 2 weeks). Then I added the batting and the back (plain solid black). Then, I packed it in a box and we moved. This was back in the summer of 2010. It stayed in a box until 3 moves and a few months later when I thought, OMG wouldn't it be the most awesomest thing ever if I actually finished that quilt. XD The above picture is the quilt spread out on the floor of the hallway outside my Craft Room. It is big enough to fit a twin-size bed.
Now, onto the details. Most of you are familiar with excited fangirlish type squeals so I don't need to go into the squee-ing part. =P For the pattern, I used an existing quilt pattern (that I have since lost and no longer remember the name of... failsauce)--the same pattern I'd used to make a quilt for my 3rd son's crib only made larger. Normally the next step is to select fabric, cut said fabric, and assemble the cut fabric into blocks. Then you would lay out those blocks and arrange them until happy with the overall effect. In this case, I started by sketching my moogle on graph paper with lines marked off to represent the size of the quilt I intended to make. I then divided the graph paper into blocks and assigned a specific block to each space--this particular pattern had 3 different block designs. Next I cut squares out of poster board measured to the size of the block. Then I transferred my moogle sketch onto the blocks, cut the blocks and labeled which side belonged to the moogle and which side belonged to the background. After all that, I determined how much of each color fabric I'd need and approximately how many different prints I wanted for each color. Only then did I actually go to the fabric store and buy the fabric. I think the most difficult part was finding white printed fabric that would still look white when pieced into the quilt and also look distinct from the other pieces of white fabric in the quilt. I chose a deep primary green for the background because I thought it went well with the whites, golds, and reds I was using for the moogle and would really make the moogle stand out.
The next big thing with this quilt was piecing together all the squares. I designed the quilt so that the overall pattern (at least as much as I possibly could) of each block stayed continuous.
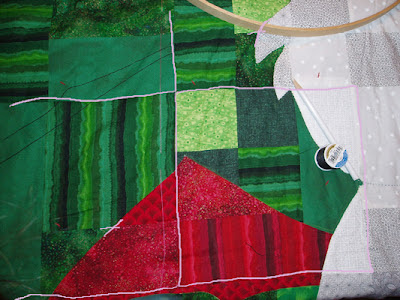
If you look at the lines I drew on the quilt above, you can see the blocks, and where I tried to keep the pattern the same even when I changed colors. For me, this was the really fun part of the project.
Right now, all that I really have left to do is quilting. The thing is way too big to run through my poor little old sewing machine, so I am hand-quilting the whole thing. Most of the quilting is going to be stitching in the outline of the moogle and the lines for his arms and legs and such. In the green background, I am going to stitch a leaf pattern--keeping it fairly simple. Below is a picture of one of the quilted leaves and a picture of where I'm quilting right now.
This has overall been a fun project. I look forward to seeing it finished. I am considering making more of those, although much smaller. I'd love to do a Full Metal Alchemist one. A lot will depend on interest in these. =)


No comments:
Post a Comment